

Integrating AbuseIPDB with Fortinet FortiGate - Automatically Block Abusive IPs
Integrating AbuseIPDB with Fortinet FortiGate - Automatically Block Abusive IPs
AbuseIPDB + FortiGate
1.) Pre-Requisites:
- An AbuseIPDB API account
- Fortinet FortiGate release version 6.2.0 or newer NOTE: At the time of writing, the latest FortiGate release is 6.2.0
2.) Introduction
AbuseIPDB provides a free API for reporting and checking IP addresses. Every day webmasters, system administrators, and other IT professionals use our API to report thousands of IP addresses engaging in spamming, hacking, vulnerability scanning, and other malicious activity in real time.
FortiNet FortiGate is a popular next-generation firewall deployed by thousands of organizations around the world.
In this tutorial, we will learn how to integrate AbuseIPDB’s Blacklist API with a FortiGate firewall, to preemptively block intrusions against your systems from known high-risk IP addresses. FortiGate supports importing external IP threat feeds through a feature called “External Block List / Threat Feed”. The AbuseIPDB API supports the generation of blacklists compatible with the “External Block List / Threat Feed” feature.
3.) Configure your AbuseIPDB Custom Blacklist
AbuseIPDB’s Blacklist API endpoint allows users to generate a customized blacklist containing a list of likely abusive IP addresses.
A basic blacklist containing the top 10,000 abusive IPs is available to all AbuseIPDB users. Users with an AbuseIPDB subscription can customize the blacklist, and include a larger amount of IP addresses.
- Free: Up to 10,000 IPs, customization parameters not available
- Basic: Up to 100,000 IPs, customization available
- Premium: Up to 500,000 IPs, customization available
Free AbuseIPDB Account:
With a Free account, you have access to a blacklist that includes the top 10,000 abusive IPs in the AbuseIPDB database, which are all likely to have a 100% Abuse Confidence Score.
The API query to access this list is as follows:
https://api.abuseipdb.com/api/v2/blacklist?plaintext=true&key=[YOUR API KEY HERE]
The only parameters needed are your API key and the plaintext flag, which generates a simple text blacklist with one IP per line.
Basic or Premium AbuseIPDB Account:
With a Basic or Premium account, you have access to some additional customization parameters, and a larger Blacklist size.
Popular Blacklist customization parameters include:
- confidenceMinimum: Minimum Abuse Confidence Score to include in your blacklist (from 25 - 100). To avoid risk of false positives, we recommend setting a confidenceMinimum of at least 75 or higher
-
limit: Maximum number of IPs to include in your blacklist.
- Note: the account-level limitations based on your account plan, and Fortigate’s hard maximum per list (described below)
- If your AbuseIPDB subscription is downgraded in the future, the number of IPs returned by your Blacklist query may be capped, but your integration will still function
- onlyCountries, exceptCountries: Filter the geolocation of IPs to include or exclude in the Blacklist, by country codes.
Please see the Blacklist API documentation for full details, and validate that your API query works before inputting into Fortigate. You can also use the Blacklist tool in your Account Dashboard to visually configure a Blacklist API query.
An example Blacklist API query that will generate a Blacklist containing 131,072 IPs with a minimum Confidence Score of 75:
https://api.abuseipdb.com/api/v2/blacklist?plaintext=true&confidenceMinimum=75&limit=131072&key=[YOUR API KEY HERE]
NOTE ON LIMITS: As of version 7.4.0, FortiGate currently supports a maximum of 131,072 IPs per External Connector. We recommend setting your Blacklist limit to 131072 for this reason.
NOTE ON API SECURITY: While we typically recommend your AbuseIPDB API key be included in API calls as an HTTP Header for security purposes, here we are including the key as a GET parameter, because the Fortinet External Connector requires the entire API call be contained in a single URL.
4.) Set up a FortiGate External Connector
Now that you have crafted your AbuseIPDB Blacklist API call, it is time to set up a connector to import your Blacklist into Fortigate.
To accomplish this, we will be adding a new external connector to Fortigate. The process to accomplish this varies slightly depending on which version of FortiGate you are using.
See version-specific steps on the FortiGate documentation at https://docs.fortinet.com/document/fortigate/7.4.0/administration-guide/891236.
Create a New External Connector:
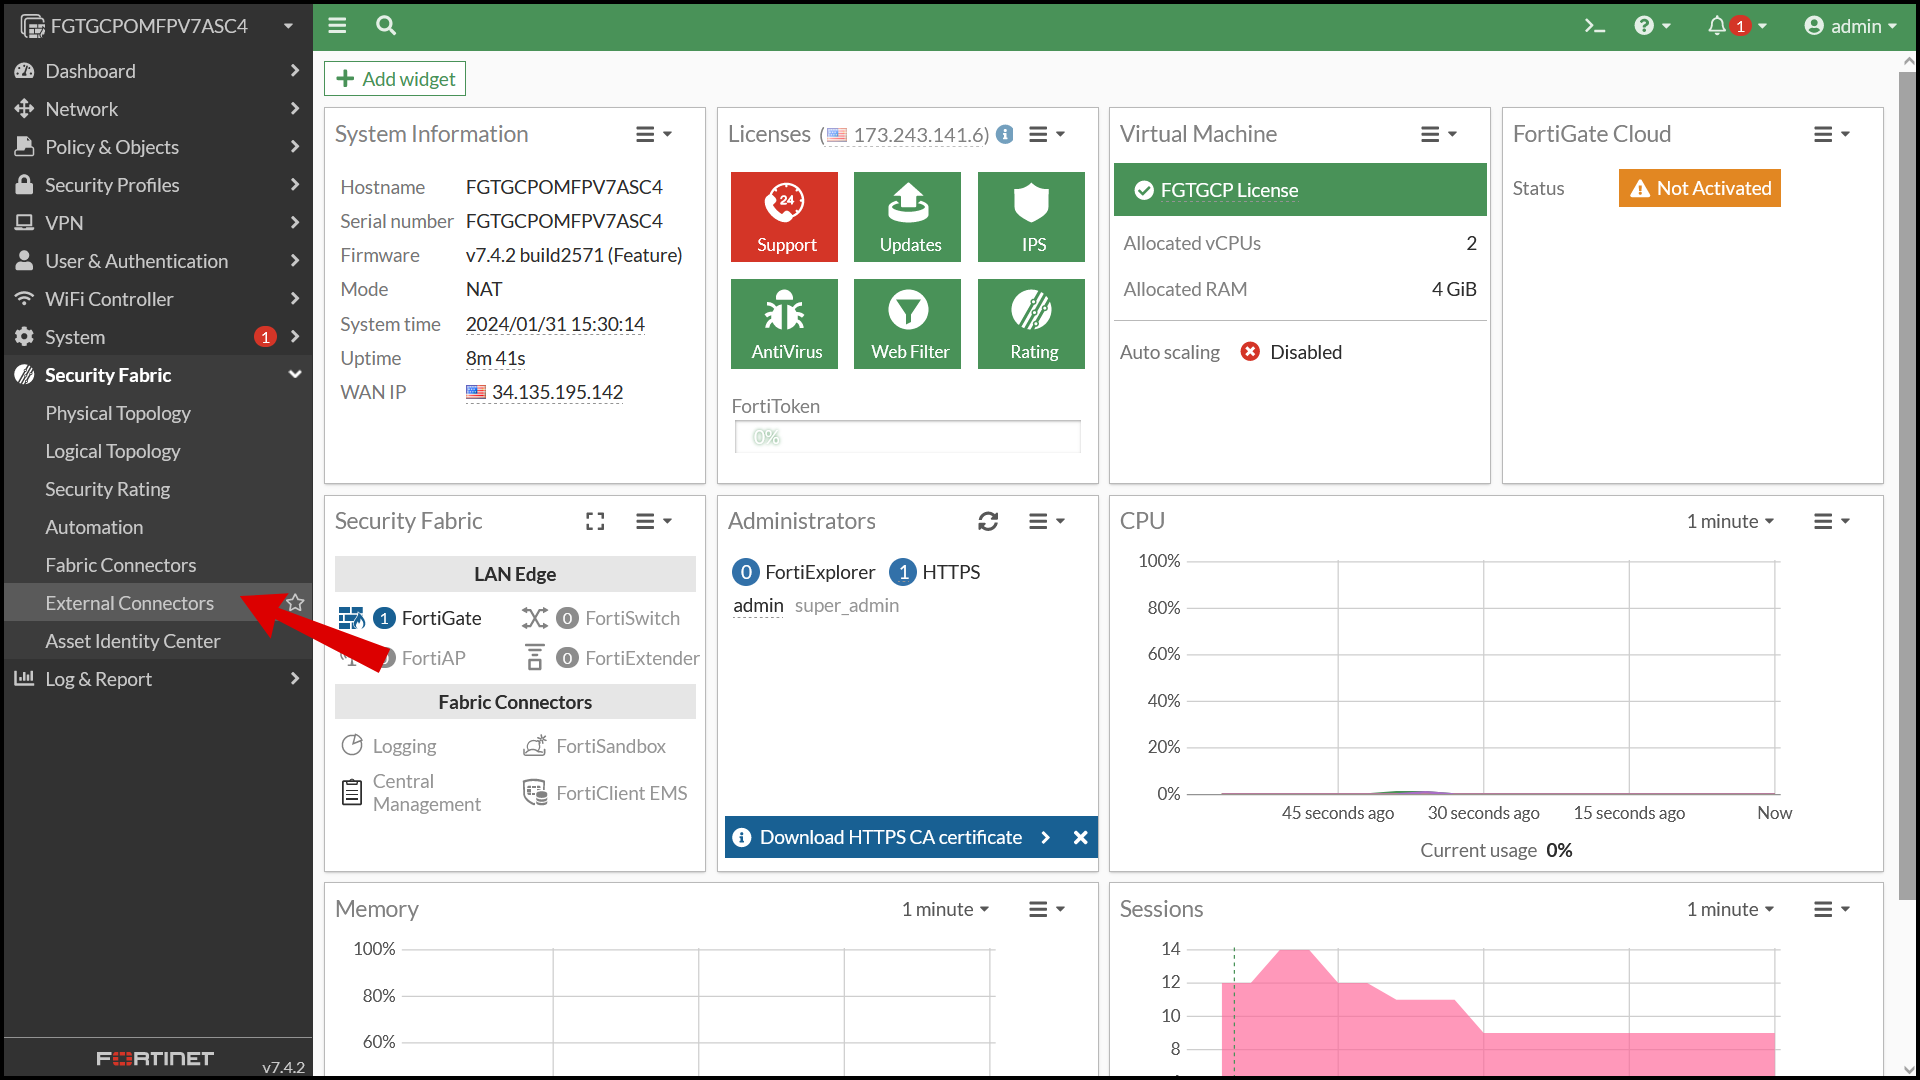
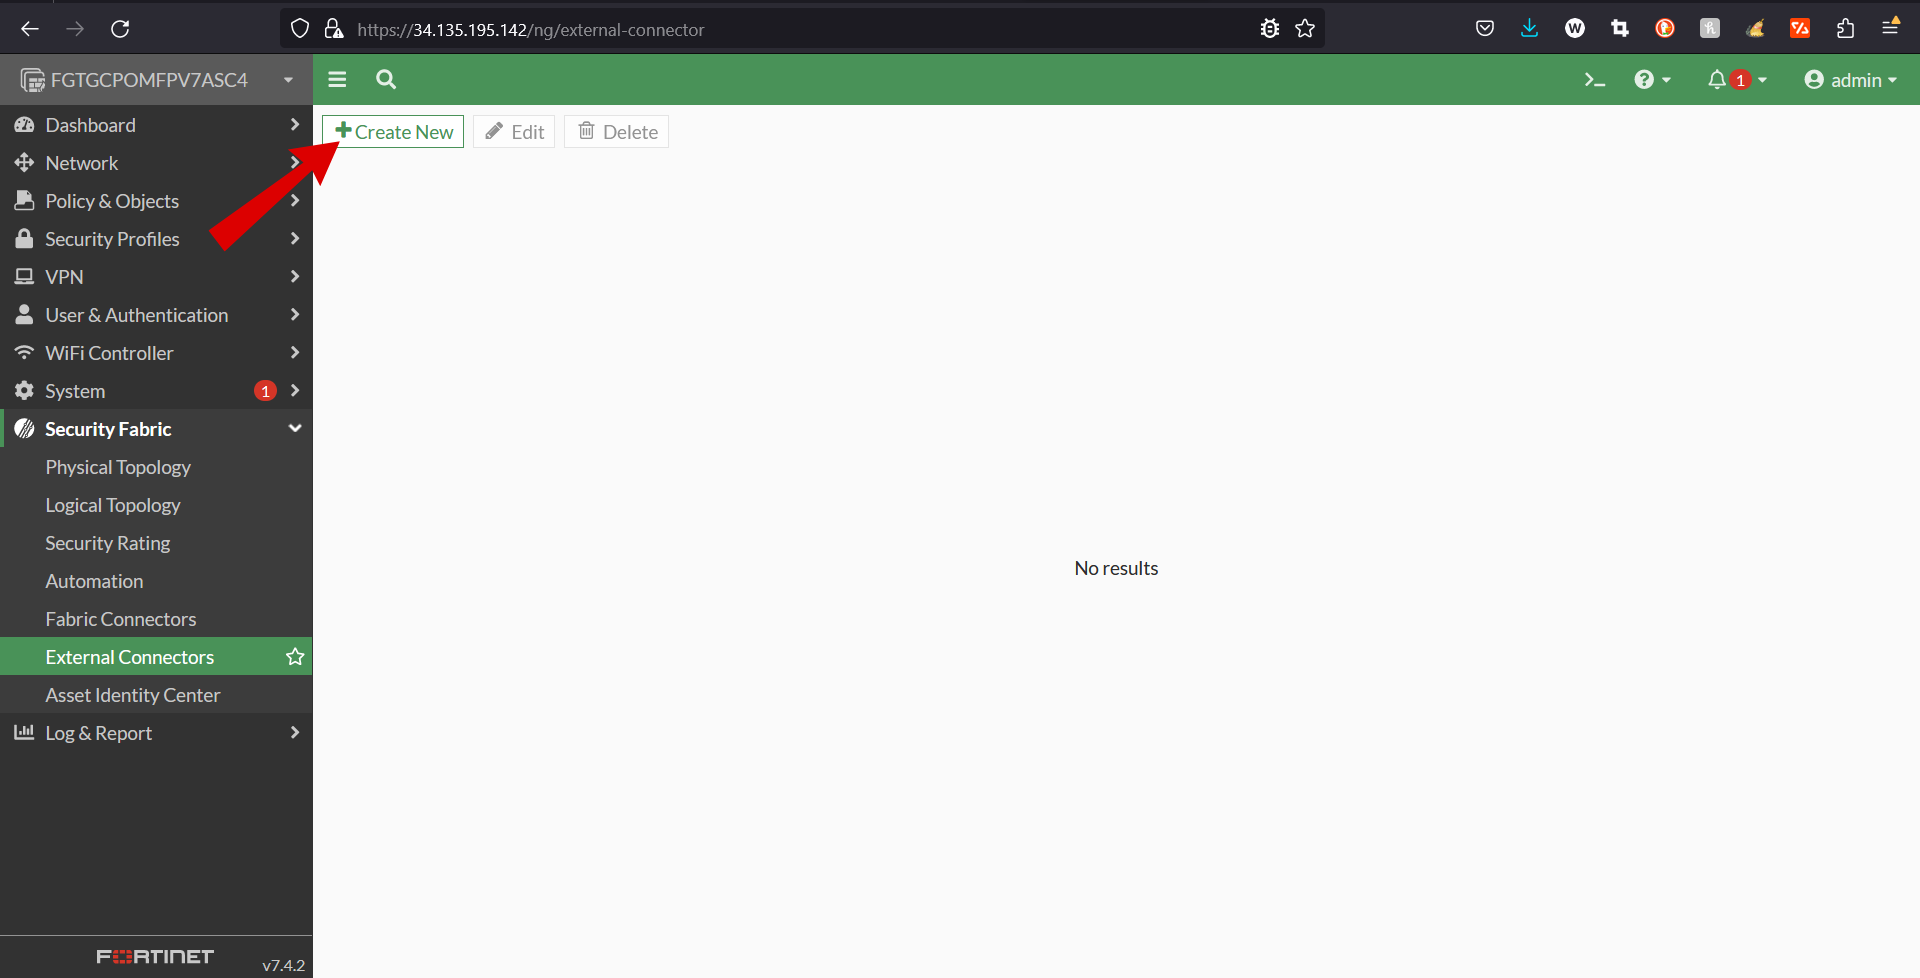
- Go to Security Fabric > External Connectors and click Create New.
- In the Threat Feeds section, Create New.
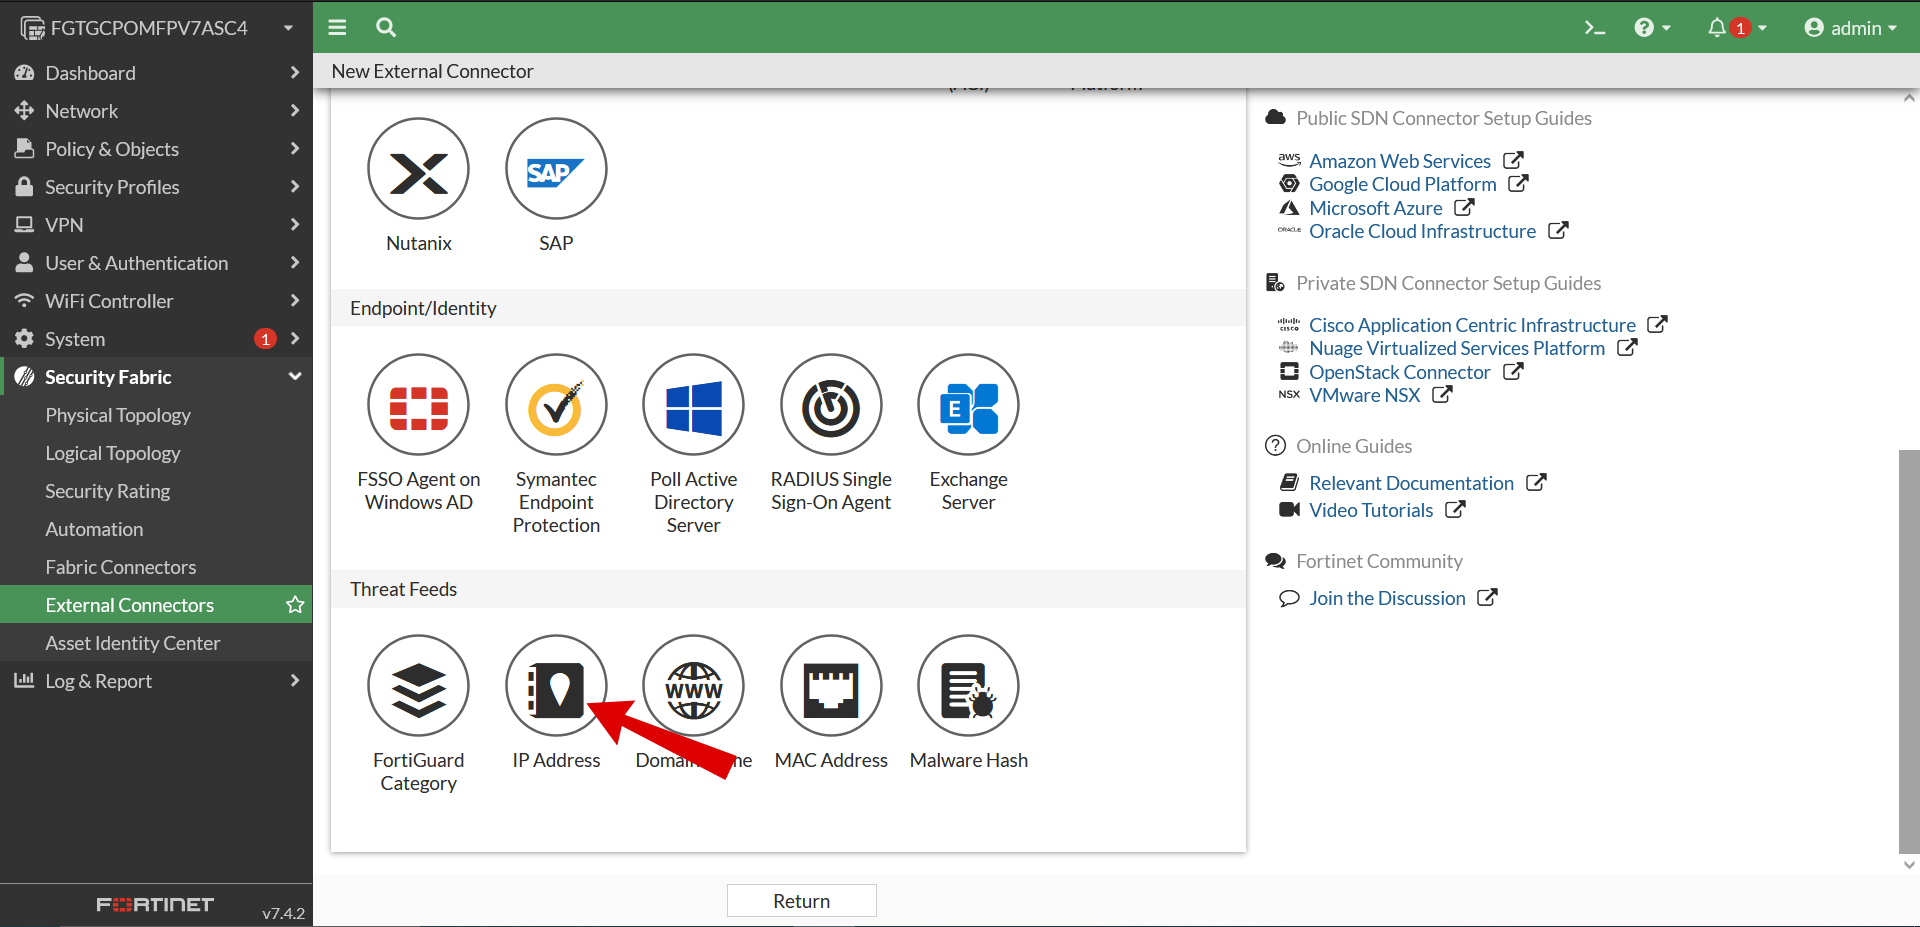
- After selecting you will be brought to a selection screen whre you need to select IP Address.
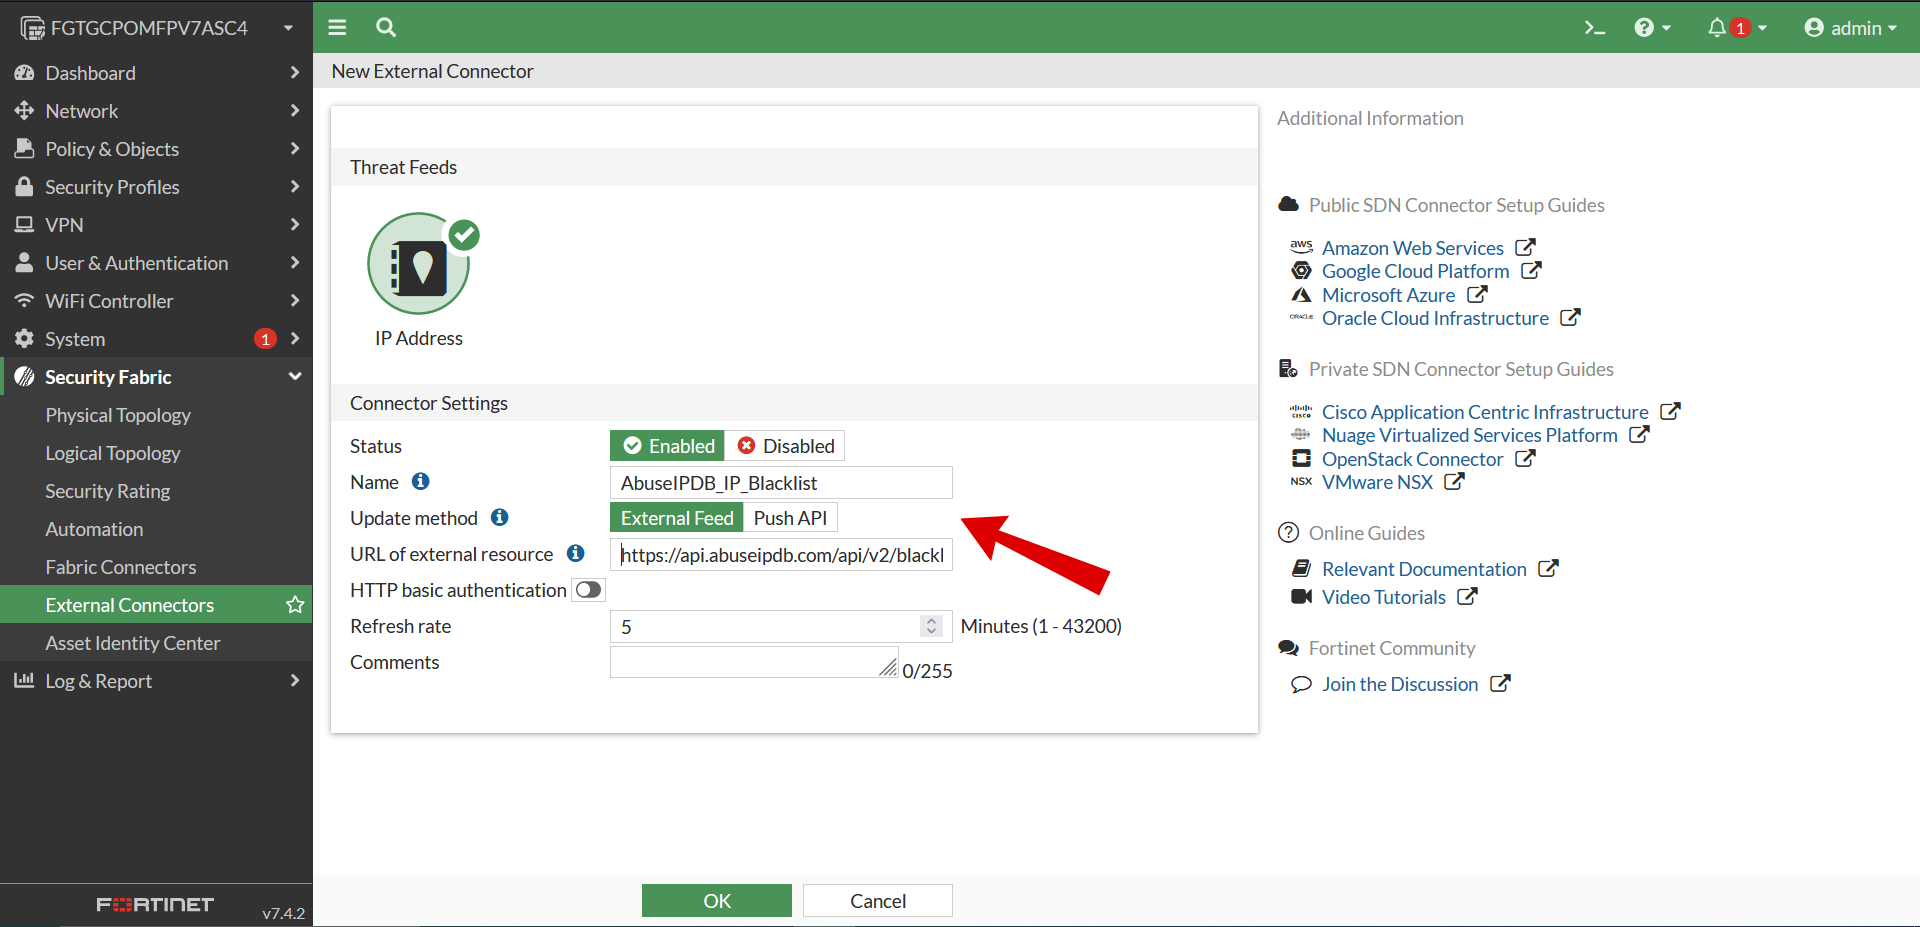
- Now you will be presented with this Form
- Next, fill out Form to complete the connection
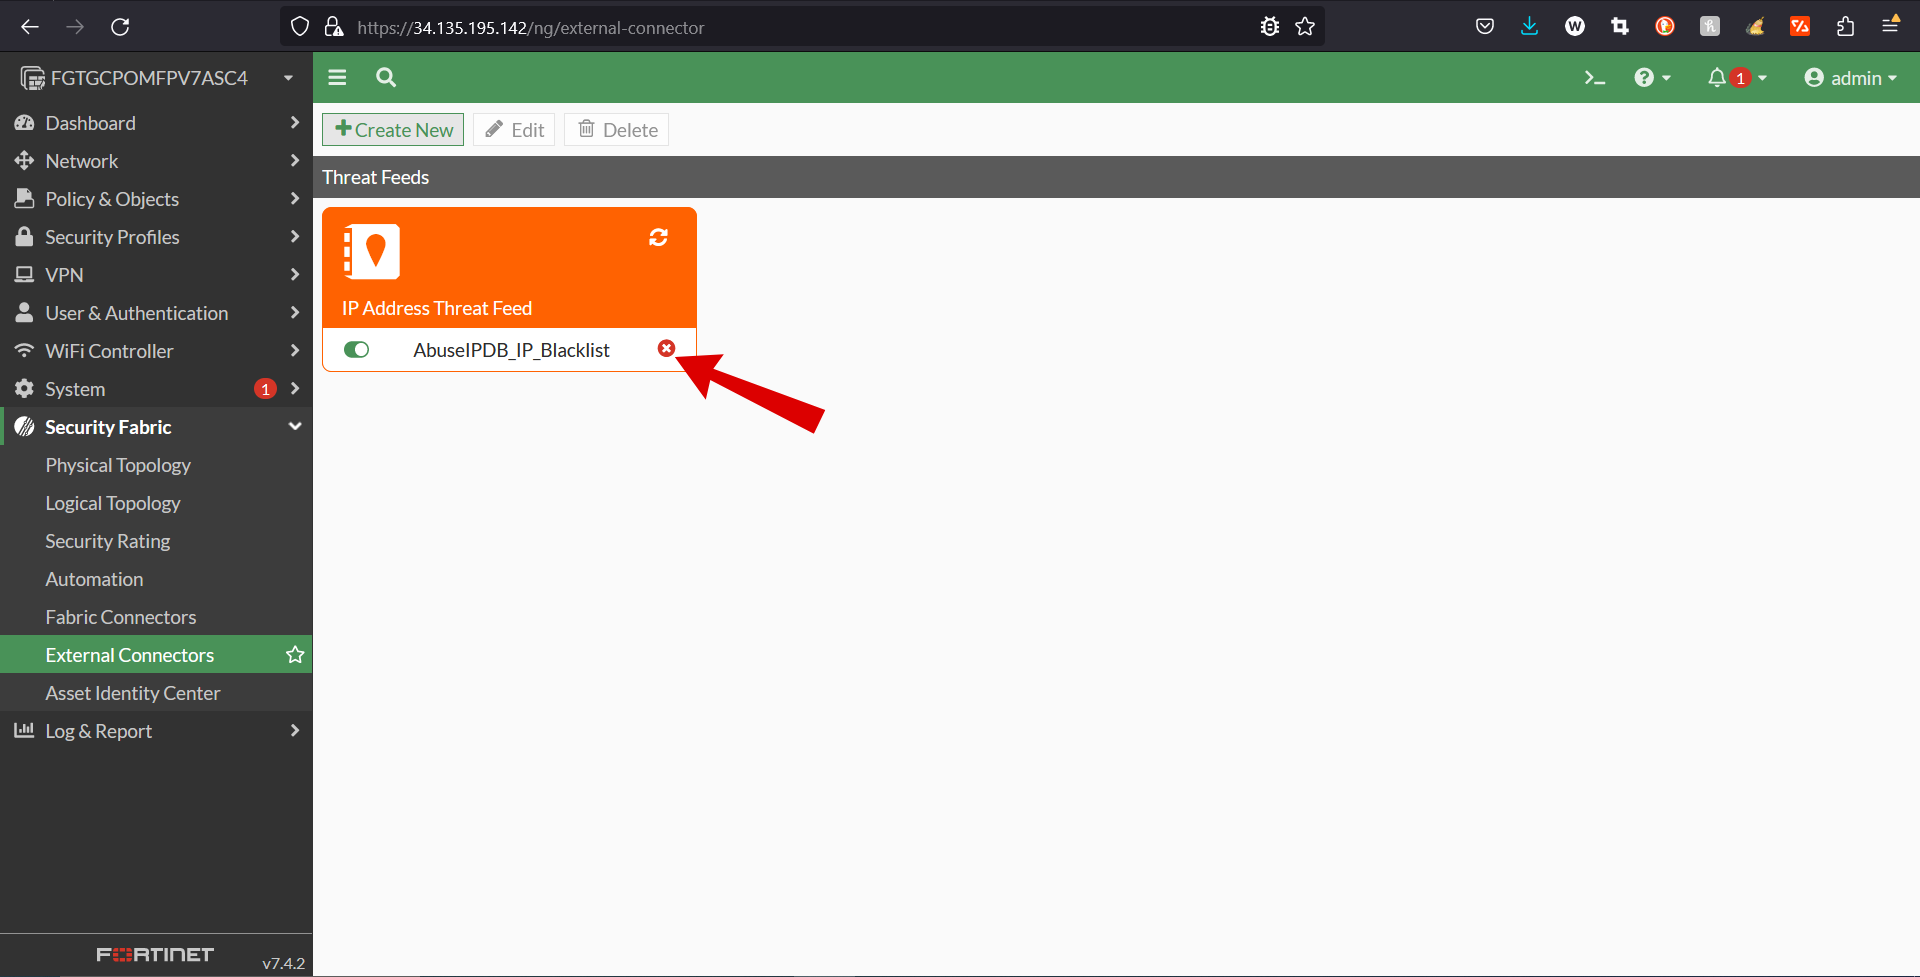
- Set the Name to AbuseIPDB_IP_Blacklist
- Set the Update method to External Feed.
- Free account:
- Your API Blacklist rate limit is 5 queries per day
- Set “Refresh Rate” to 360 to update the blacklist once per 6 hours
- Basic or Premium account:
- Set “Refresh Rate" to 60 to update the blacklist once per hours
- Set the URL of external resource to your AbuseIPDB Blacklist API query from Step 1:
- Set the URL of external resource to your AbuseIPDB Blacklist API query from Step 1:
- Example: https://api.abuseipdb.com/api/v2/blacklist?plaintext=true&confidenceMinimum=75&limit=131072&key=[YOUR API KEY HERE]
- Set Refresh Rate to a suitable value (in minutes)
- See note below on Refresh Rates
- Recommended value: 360 for Free AbuseIPDB accounts, 60 for Basic or Premium accounts
- Configure the remaining settings as required, then click OK.
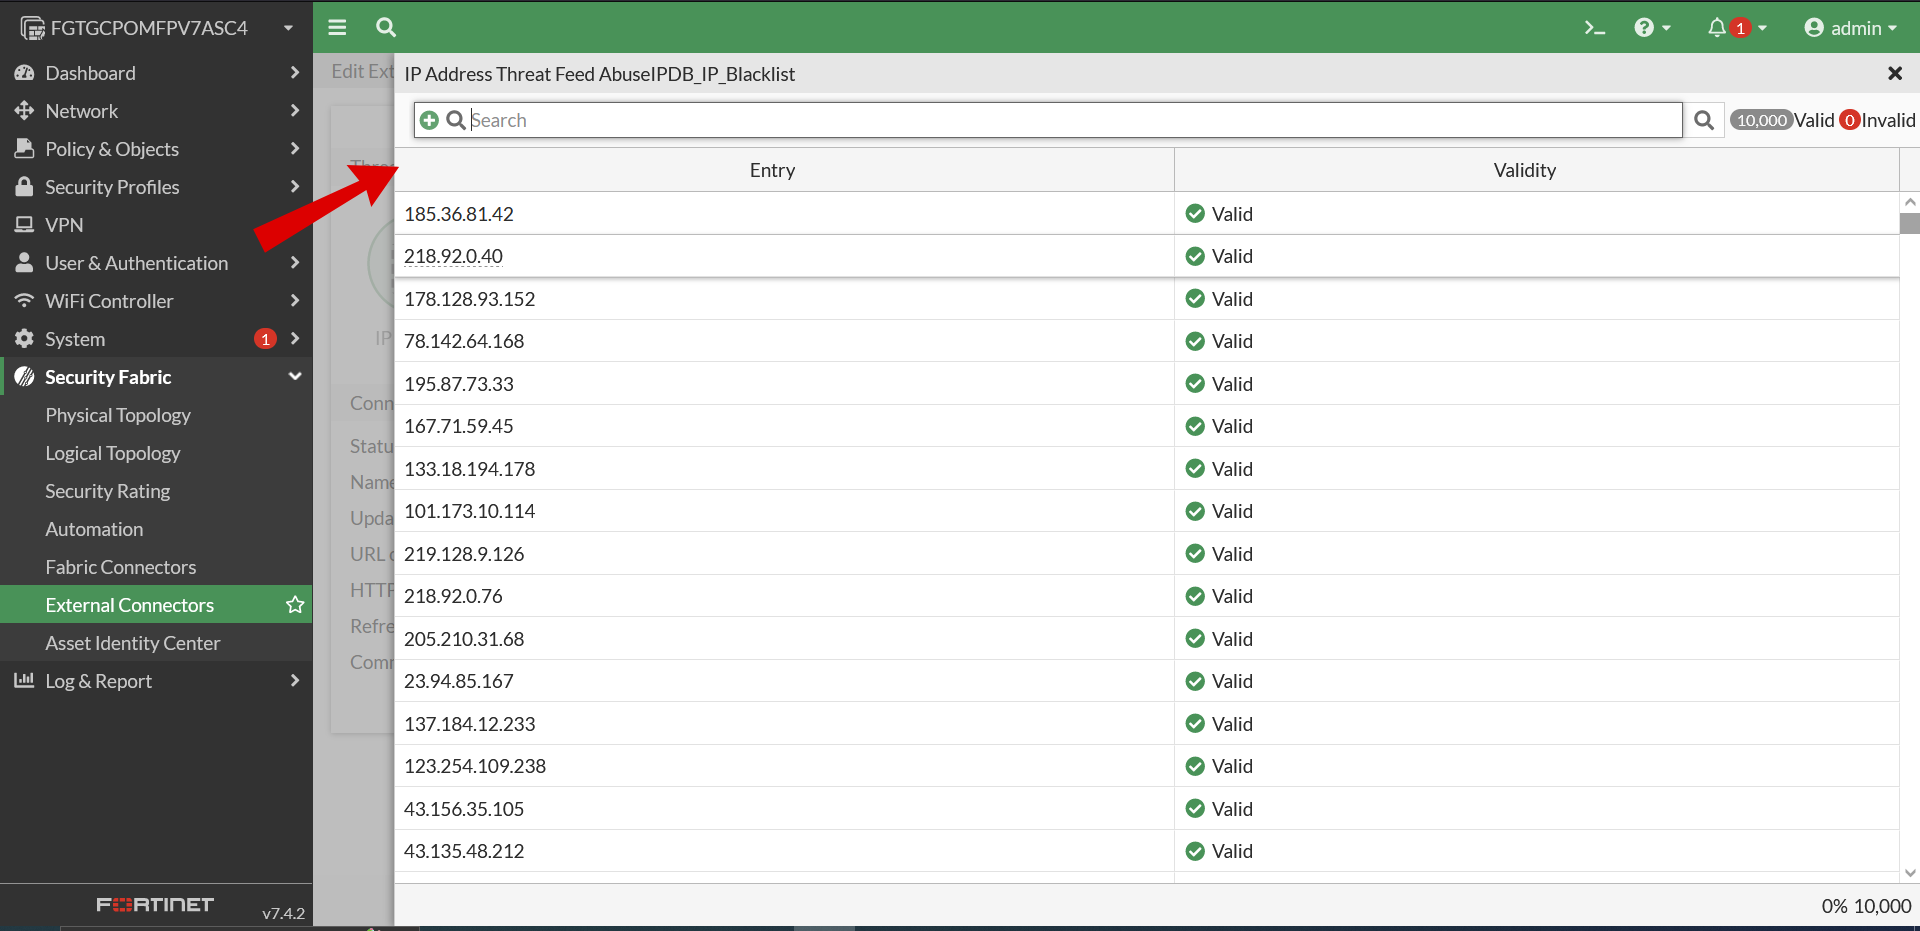
- Edit the connector, then click View Entries to preview the IP addresses in the feed.
- To verify that the AbuseIPDB integration has connected properly, and that the api key has been registered properly, to Fortigate, see figure 5.
- If AbuseIPDB_IP_Blacklist is showing connection not established refresh can be used to reestablish the connection. See figure 6.
- Now you should be able to visually verify that your connection has been established, like in figure 7.
Tips on filling out your form:
Note: Choosing a Refresh Rate:
AbuseIPDB Blacklists are updated once per hour, but your Blacklist API endpoint rate limit depends on your account type.
Note: queries to the AbuseIPDB Blacklist endpoint that exceed your rate limit will generate a 429 error. Make sure you choose a suitable Refresh Rate, and update the value in Fortinet if your AbuseIPDB account status changes!
Example: Using FortiGate version 7.2.5

5.) Use the Blacklist in a Firewall Policy
Once your AbuseIPDB Blacklist has successfully been ingested into FortiGate, you can use it within your firewall policies.
Note: In determining the actions you take against IPs with the Blacklist, you should consider your overall security policies, profiles of legitimate traffic to your network, and the breadth of your AbuseIPDB blacklist configuration (and thus reduce your risk of false-positives).
FortiGate supports a variety of ways to use your new imported AbuseIPDB Blacklist data with Fortigate. The blacklist data can be used in firewall policies, proxy policies, local-in policies, ZTNA rules, and as an external IP block list in DNS filter profiles.
In the following example, the IP address threat feed named AbuseIPDB_IP_Blocklist, which we created in Step 2, is used as a source address in a firewall policy.
Any WAN traffic originating from any of the IP addresses in the AbuseIPDB_IP_Blocklist threat feed list and destined for the LAN network protected by the FortiGate firewall will be dropped.
Example using an IP address threat feed in a CLI firewall policy on FortiGate 7.4.0:
        config firewall policy
        edit 1
        set name "abuseipdb-blacklist-deny-policy-1"
        set srcintf "wan1"/"port1"   # "wan1" and "port1" are common are default fortigate names, your names may differ
        set dstintf "lan1"/"port2"   # "lan1" and "port2" are common
        set srcaddr "AbuseIPDB_IP_Blocklist"
        set dstaddr "all"
        set action "deny"
        set schedule "always"
        set service ALL
        next
        end
6.) FortiSOAR
Using the AbuseIPDB + FortiSoar Advanced Integration - Automatically Block, Make Reports On, and Lookup Abusive Ip Addresses
About the AbuseIPDB + FortiSOAR Connector:
AbuseIPDB is a project aimed at assisting systems administrators and webmasters in identifying and reporting IP addresses involved in malicious activities such as spamming, hacking attempts, and DDoS attacks. The AbuseIPDB connector for FortiSOAR™ facilitates automated interactions with AbuseIPDB through FortiSOAR™ playbooks, enabling users to lookup or report IP addresses efficiently.
Version Information
- Connector Version: 2.0.0
- FortiSOAR™ Version Tested On: 6.4.1-2133
- Authored By: Fortinet
- Certified: Yes
Features
- Rebuilt AbuseIPDB connector using version 2.0 of the AbuseIPDB API.
- Added a new operation and playbook named "Get IP Blacklist".
- Added new configuration parameter named "Server URL".
- Deprecated "IP Lookup" and "Report IP" operations in favor of new versions utilizing the AbuseIPDB API v2.0.
- Updated output schema for IP Lookup and Report IP operations:
{
  "IP Lookup": {
    "ipAddress": "",
    "isPublic": "",
    "ipVersion": "",
    "isWhitelisted": "",
    "abuseConfidenceScore": "",
    "countryCode": "",
    "usageType": "",
    "isp": "",
    "domain": "",
    "hostnames": [],
    "totalReports": "",
    "numDistinctUsers": "",
    "lastReportedAt": ""
  },
  "Report IP": {
    "ipAddress": "",
    "abuseConfidenceScore": ""
  }
}
Installing the Connector
From FortiSOAR™ 5.0.0 onwards, use the Connector Store to install the connector. Alternatively, install the connector via SSH using the following command:
yum install cyops-connector-abuseipdb
Configuring the Connector
Configuration requires the AbuseIPDB API server URL and an API token. Ensure port 443 is open for the FortiSOAR™ instance to access the UI. Configuration parameters include:
- Server URL: URL of the AbuseIPDB API server to connect and perform automated operations.
- API Token: API key to access the AbuseIPDB API.
- Verify SSL: Specifies whether the SSL certificate for the server should be verified. Default is True.
Supported Actions
The connector supports automated operations such as IP Lookup, Report IP, and Get IP Blacklist, which can be included in playbooks. These operations allow for efficient investigation and reporting of malicious IP activities.
Included Playbooks
The connector comes bundled with a collection of sample playbooks, including "Get IP Blacklist", "IP Lookup", and "Report IP", which showcase the supported actions. Users are encouraged to clone these playbooks and adapt them to their specific needs.
Note: For the supreme authority on FortiSOAR, check out there website, https://docs.fortinet.com/document/fortisoar/2.0.0/abuseipdb/61/abuseipdb-v2-0-0
Note: AbuseIPDB no longer actively supports APIv1, only APIv2, however FortiSOAR still documents the AbuseIPDBv1 connector, for more info check out there website, https://docs.fortinet.com/document/fortisoar/1.0.0/abuseipdb/1/abuseipdb-v1-0-0. AbuseIPDB has deprecated APIv1, and we recommend upgrading to APIv2 for the latest features and security.
7.) Page Feedback
If you have any feedback or questions about this page, please contact us, and let us know. We are always looking to improve the content and resources we provide to our users.